
The Compost Bin Structure That Iris Built
Iris is in her second year of internship on the farm. She’s a student at a nearby arts high school and she’s recently been accepted into a summer month-long writing program at Berry College near Rome Georgia. As a part of her winter project, she reviewed various compost bin designs, selected one, then built a compost bin, then wrote this essay, and sketched to share the experience.
Starting to build this compost bin seemed a bit daunting to me. How was I, someone who had hardly worked with wood before, supposed to create a structure that would stand for at least ten years to come? After some research, I found that the existing bin had nearly the perfect layout already. I used it as my blueprint, then added several more pieces to make my model sturdier and as Jenks put it, “more handsome”.
I worked step by step, sketching out the bin first, labeling the pieces I needed, finding and assembling those pieces, tearing down the old structure, digging out the post holes, and finally nailing everything in place.
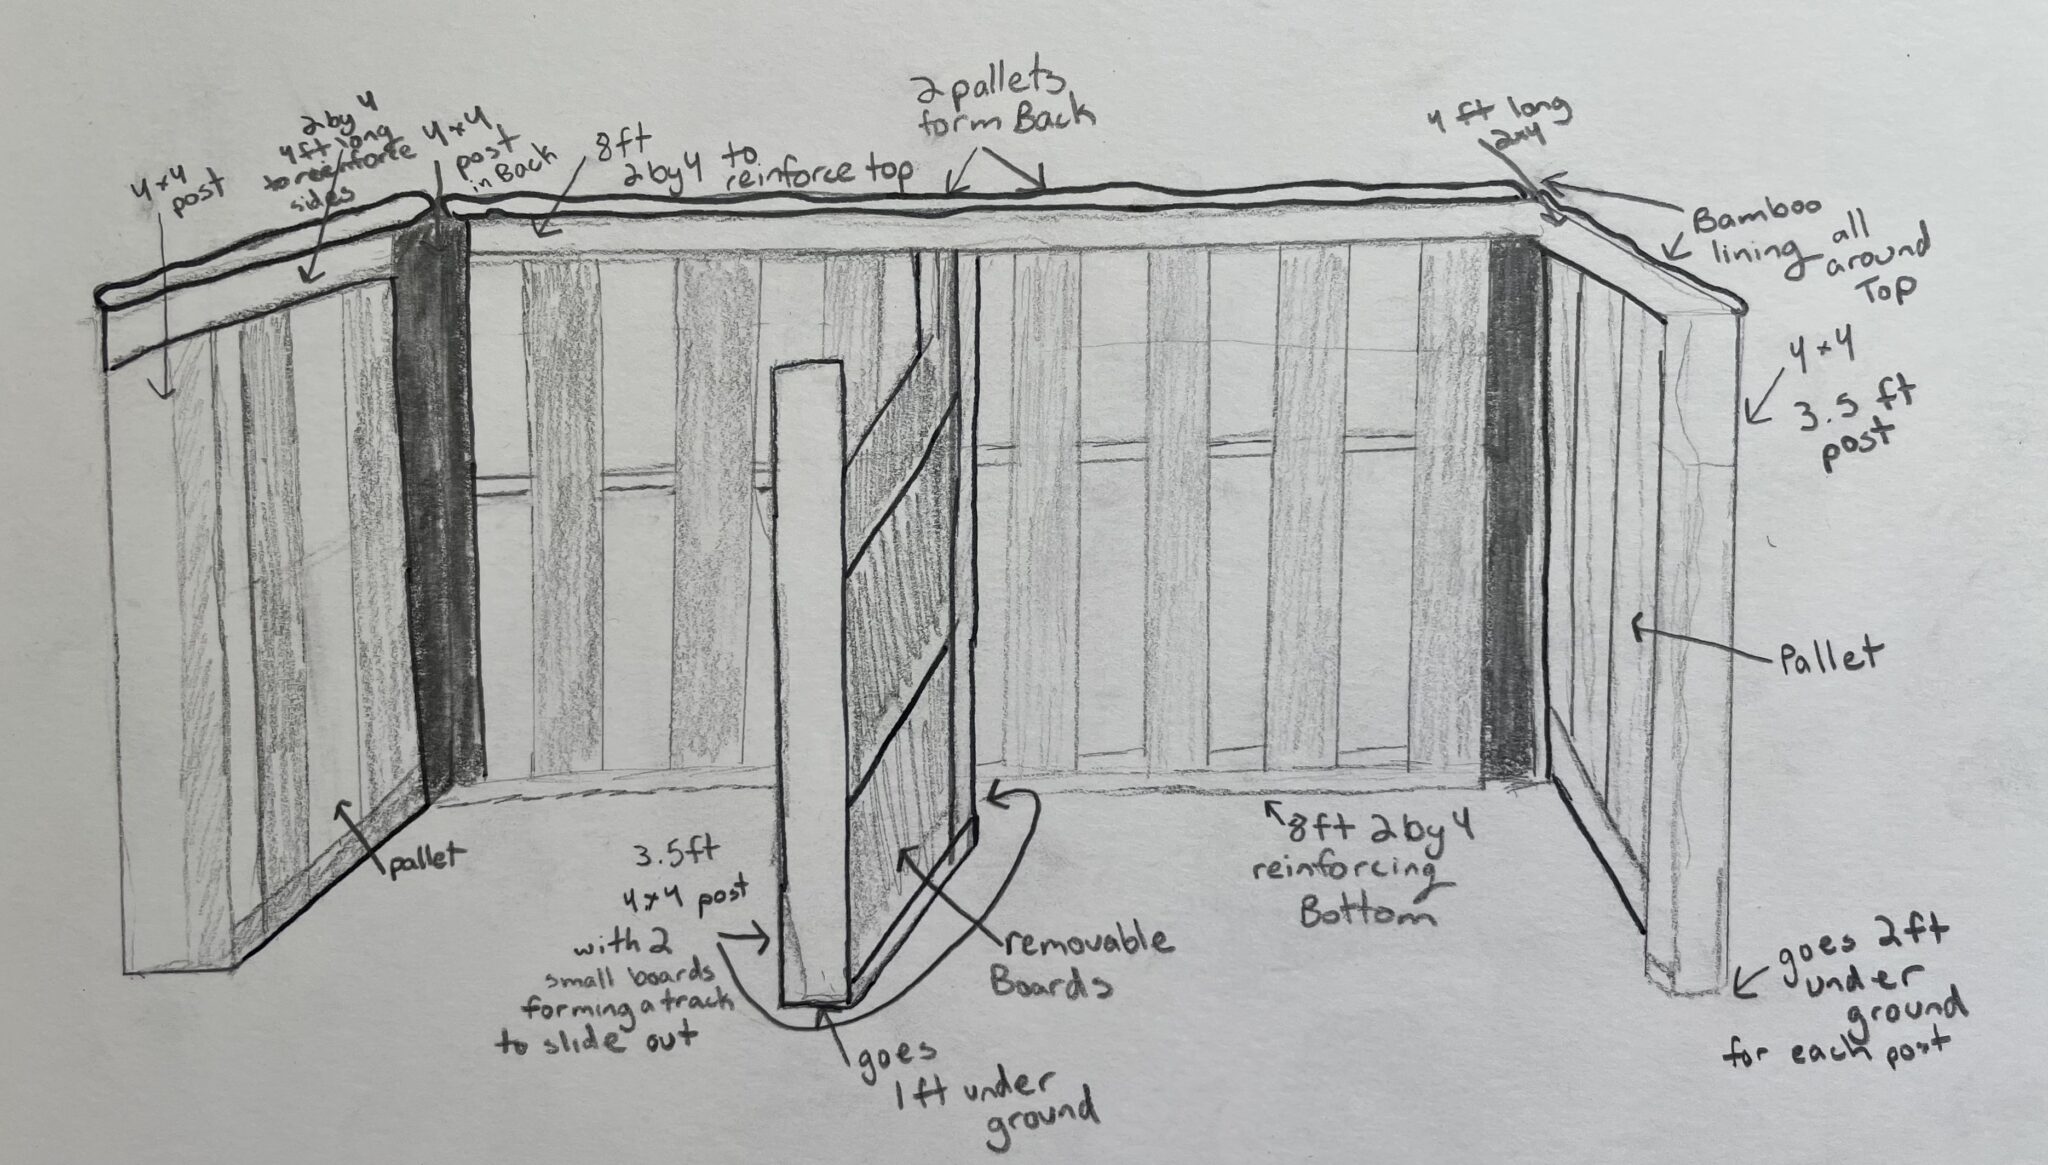
Iris sketched out a parts list and final look of the compost bin.
I began to draw it out, there would be six posts, two in the middle and four in the corners. To fill the existing space, the bin had to be eight feet long and four feet deep, so we needed a 2×4 board of each of those lengths. I added an extra eight-foot 2×4 four on the bottom of the back wall for stability. After some debate, I decided to use inspiration from the original design and make the four outer walls out of wooden pallets.
Possibly the smartest part about this design is the movable wall in the center. The middle two posts each have two thin boards on either side, they leave a gap in the middle that allows for the middle boards to slide right in and out. The purpose of this is so that you can rotate back and forth what side has the dirt and what side has the layers that are breaking down into dirt. To get the best results when making your compost, it is best to put down everything in layers, food scraps followed by leaves, followed by garden scraps then leaves and so on.
I then had to acquire all these pieces. Most of the 4×4 posts and the 2×4 boards we bought at Lowes, any extras that we needed we found back in our woodpiles. Before I came out to work at the farm, a few wooden structures were taken down and their pieces were sorted out into matching piles, making finding any extra boards and posts much easier for all the projects we have worked on. The pallets were a little harder to find, Jenks had to drive around and eventually found some behind various retail stores. If you are looking for pallets, you can pretty much find them anywhere, it just takes a bit. I’ve started noticing them more and more after driving around actually trying to find them just that once.
With all the pieces ready to assemble, it was time for the fun part, tearing the old compost bin down. With the help of Mathew and a couple of hammers, we were able to break off the walls and pull out the posts. Twelve years of aging allowed the process to go much faster. We found that the existing posts were only 12 or so inches in the ground, so we went through and dug down another half foot so that our posts would go in even deeper. We did some work to level the ground and trimmed back the plants right around where the boards would be. We tried to avoid putting the boards right on the ground if we could, they break down and rot a lot faster if they are on or in the soil.
After some final measurements on the cleared ground, we cut all the boards to their final lengths. All six of the posts were cut to five and a half feet, the two back 2x4s to eight, and the two side 2x4s to four. We slipped the posts in and packed them in with dirt. It is very important to slowly fill in the space around the posts, packing the dirt in every few inches. This allows the posts to be very sturdy.
While digging up the ground, I was amazed by the number of worms. You can always tell how good your soil is from the things that live in it.
We used the screwdriver to secure the board on the bottom back of the bin. The board not only makes the structure extra sturdy but allows you to pile up dirt on it and dig the dirt out without worrying that your shovel could break through. The three 2x4s along the top of the bin were fitted on, holding the remaining posts together. We then started fitting the pallets in. We made the decision to cut off the top half of the boards on the outsides of the pallets, making the cuts flush with the centerboard of the pallet. This allowed us to nail the exposed one layer of boards right onto the top 2x4s. It also looked more attractive that way.
Once the main structure was in place it was time to nail the four small boards onto the two central posts. We used the same boards for the sliding section that the old bin did, though they are very easy to replace. I then found several bamboo pieces, measured them, and cut them down to size. When using the screwdriver to screw the bamboo on, it’s important to make a small hole first, as the bamboo material splits very easily. Then the bin was done! It is already being put to use and helps to fuel production, primarily in our vegetable garden. It was not a super hard build, and it will hopefully last for the next fifteen years.
Putting time and effort into a project like that is very worthwhile. I am very grateful that I was able to learn how to make something like this and that I will always have those skills.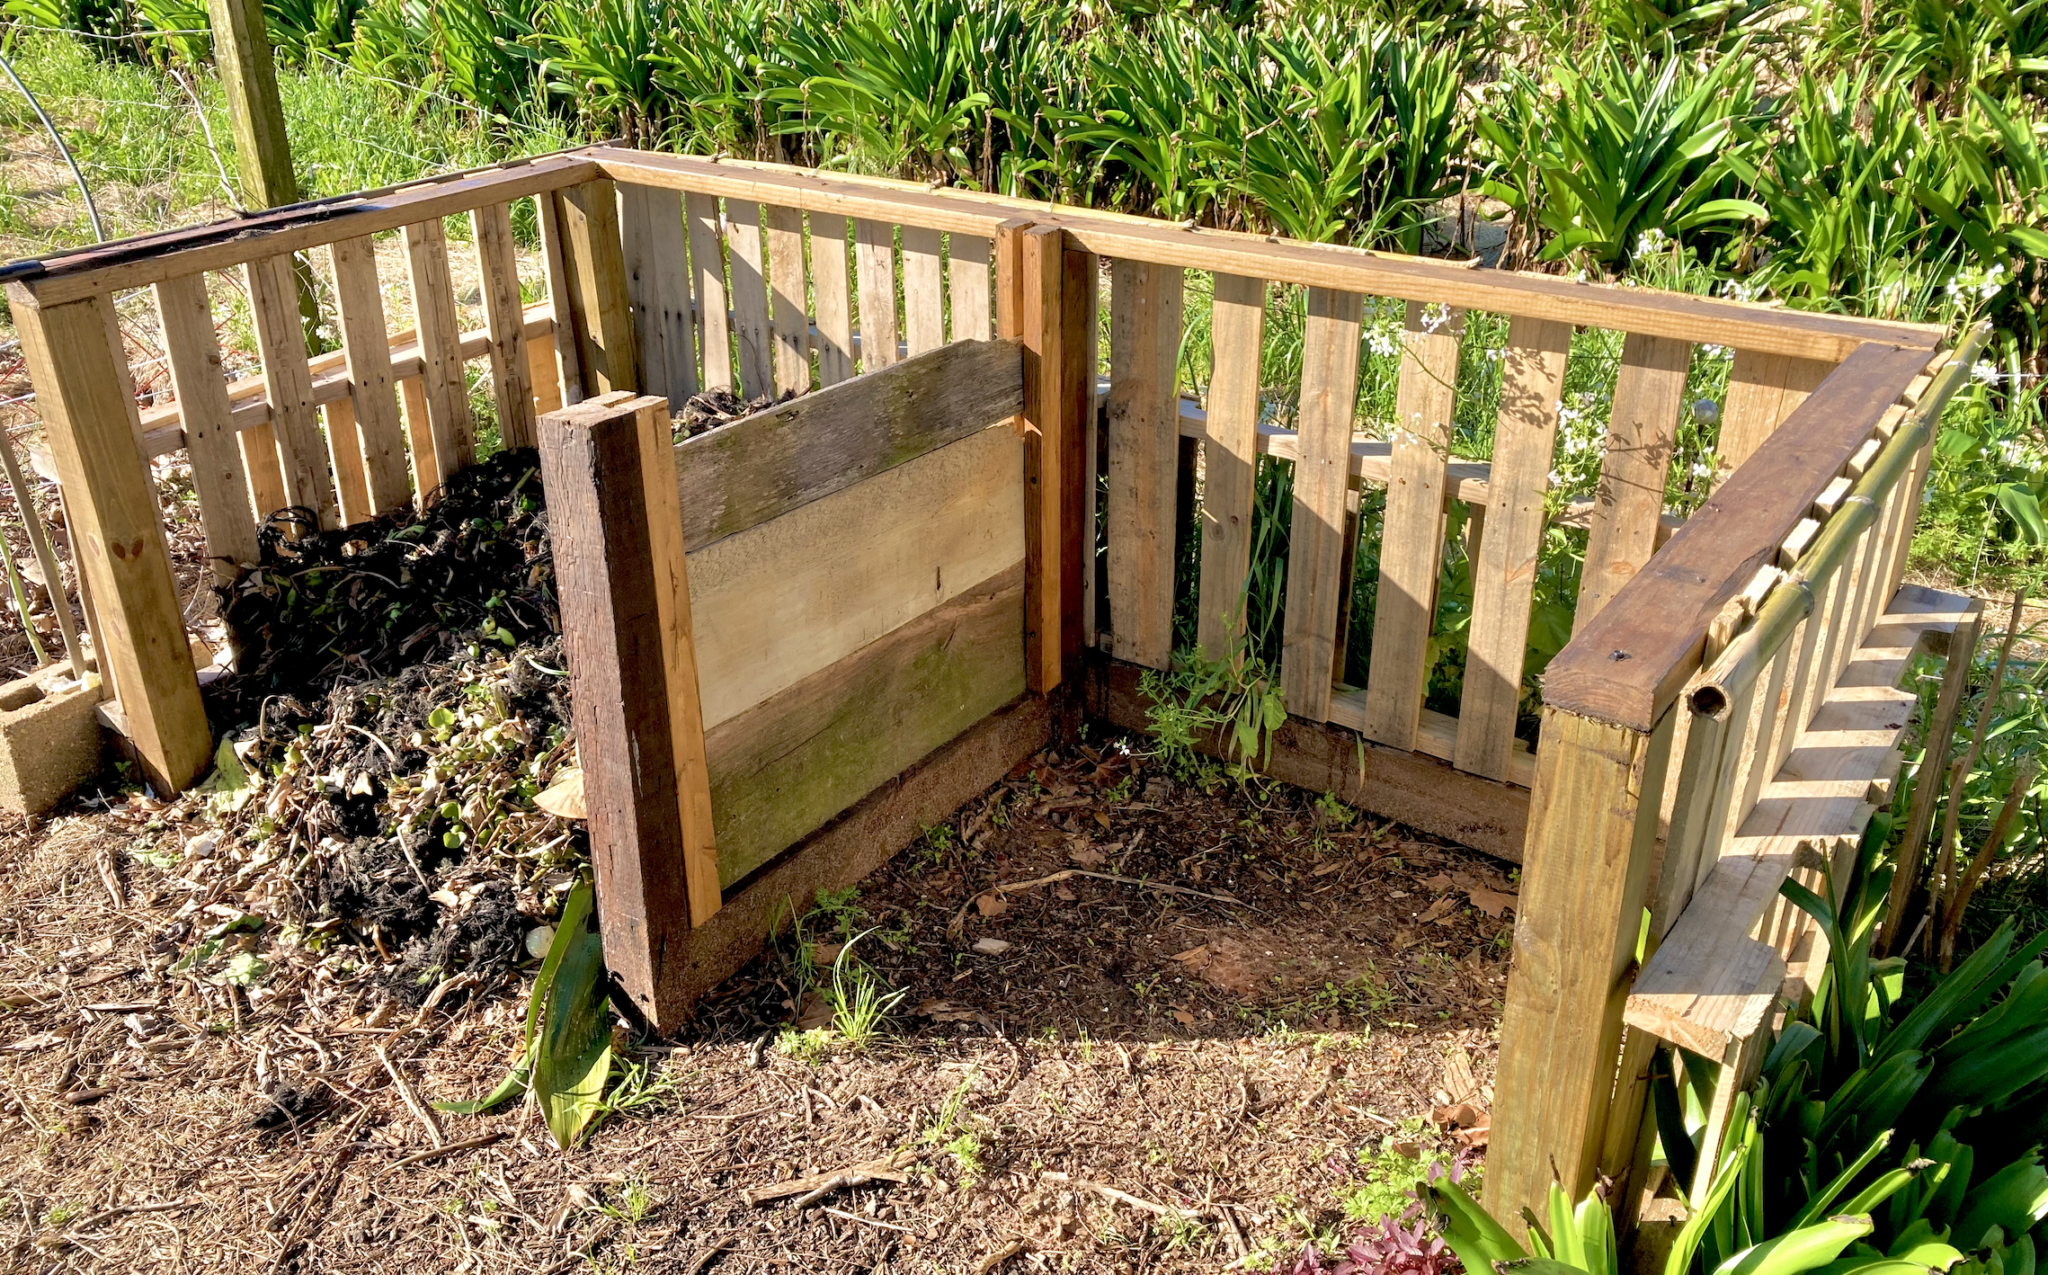
This article is so well written! I read it and feel as though I now have a coherent plan to build a compost bin. It explains the entire process step by step, listing the materials needed for completion giving hints along the way to ensure the success of the novice builder.
Great job Iris (and your bamboo trim is the bomb!!
So proud of Iris and of the intern program! Jenks constantly teaches the next generation of plantsmen, artists, philosophers, craftsmen, and all-around good humans to ge the very best they can be.
Fabulous essay, fabulous project! Thanks for sharing!!
A beautiful combination of design/artwork and well written step by step description of the final product! Great job, Iris!
Great job! I really like the added bamboo. Keep up the good work.
Linda Suber